文章目录
第6章 安装TensorFlow
这里主要介绍基于Linux下的TensorFlow安装,TensorFlow的安装又分为CPU版和GPU版的。使用CPU的相对简单一些,无需安装GPU相关驱动及CUDA、cuDNN等。不过无论哪种安装,我们推荐使用Anaconda作为Python环境,因为这样可以避免大量的兼容性问题,而且使用其中的conda进行后续程序更新非常方便。这里使用Python3.6,TensorFlow为1.4。
6.1 TensorFlow CPU版的安装
TensorFlow的CPU版安装比较简单,可以利用编译好的版本或使用源码安装,推荐使用编译好的进行安装,如果用户环境比较特殊,如gcc高于6版本或不支持编译好的版本,才推荐采用源码安装。采用编译好的进行安装,具体步骤如下:
(1)从Anaconda的官网(https://www.anaconda.com/)下载Anaconda3的最新版本,如Anaconda3-5.0.1-Linux-x86_64.sh,建议使用3系列,3系列代表未来发展。 另外,下载时根据自己环境,选择操作系统、对应版本64位版本。
(2)在Anaconda所在目录,执行如下命令:
(3)接下来根据会看到安装提示,直接按回车即可,然后,会提示选择安装路径,如果没有特殊要求,可以按回车使用默认路径,然后就开始安装。
(4)安装完成后,程序提示我们是否把anaconda3的binary路径加入到当前用户的.bashrc配置文件中,建议添加,添加以后,就可以使用python、ipython命令时自动使用Anaconda3的python3.6环境。
(5)使用conda进行安装
(6)验证安装是否成功
|
1 2 3 4 5 |
import tensorflow as tf hello = tf.constant('Hello, TensorFlow!') sess = tf.Session() print(sess.run(hello)) |
6.2 TensorFlow GPU版的安装
TensorFlow的GPU版本安装相对步骤更多一些,这里采用一种比较简洁的方法。目前TensorFlow对CUDA支持比较好,所以要安装GPU版本的首先需要一块或多块GPU显卡,显卡一般采用NVIDIA显卡,AMD的显卡只能使用实验性支持的OpenCL,效果不是很好。
接下来我们需要安装:
显卡驱动
CUDA
cuDNN
其中CUDA(Compute Unified Device Architecture),是英伟达公司推出的一种基于新的并行编程模型和指令集架构的通用计算架构,它能利用英伟达GPU的并行计算引擎,比CPU更高效的解决许多复杂计算任务。NVIDIA cuDNN是用于深度神经网络的GPU加速库。它强调性能、易用性和低内存开销。NVIDIA cuDNN可以集成到更高级别的机器学习框架中,其插入式设计可以让开发人员专注于设计和实现神经网络模型,而不是调整性能,同时还可以在GPU上实现高性能现代并行计算,目前大部分深度学习框架使用cuDNN来驱动GPU计算。以下为在ubuntu16.04版本上安装TensorFlow1.4版本的具体步骤。
(1)首先安装显卡驱动,首先看显卡信息。
(2)查是否已安装驱动
(3)更新apt-get
(4)安装一些依赖库
(5)安装 nvidia 驱动
sudo dpkg -i ./cuda-repo-ubuntu1604_8.0.61-1_amd64.deb
sudo apt-get update
sudo apt-get install cuda -y
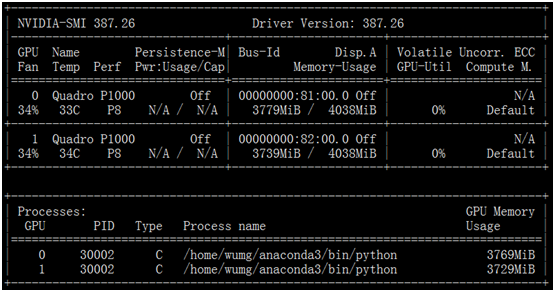
(6)检查驱动安装是否成功
运行结果如下

说明驱动安装成功。
(7)安装cuda toolkit(在提示是否安装驱动时,选择 n,即不安装)
|
1 2 3 4 5 6 7 8 9 10 11 12 13 14 15 16 17 18 19 20 21 22 23 24 25 26 27 28 29 30 |
wget https://s3.amazonaws.com/personal-waf/cuda_8.0.61_375.26_linux.run sudo sh cuda_8.0.61_375.26_linux.run # press and hold s to skip agreement # Do you accept the previously read EULA? # accept # Install NVIDIA Accelerated Graphics Driver for Linux-x86_64 361.62? # 这步非常重要,一定要选中n,即不再安装驱动了,因前面已安装驱动! # n # Install the CUDA 8.0 Toolkit? # y # Enter Toolkit Location # press enter # Do you want to install a symbolic link at /usr/local/cuda? # y # Install the CUDA 8.0 Samples? # y # Enter CUDA Samples Location # press enter # now this prints: # Installing the CUDA Toolkit in /usr/local/cuda-8.0 … # Installing the CUDA Samples in /home/liping … # Copying samples to /home/liping/NVIDIA_CUDA-8.0_Samples now… # Finished copying samples. |
(8)安装cudnn
|
1 2 3 4 5 |
wget https://s3.amazonaws.com/open-source-william-falcon/cudnn-8.0-linux-x64-v6.0.tgz sudo tar -xzvf cudnn-8.0-linux-x64-v6.0.tgz sudo cp cuda/include/cudnn.h /usr/local/cuda/include sudo cp cuda/lib64/libcudnn* /usr/local/cuda/lib64 sudo chmod a+r /usr/local/cuda/include/cudnn.h /usr/local/cuda/lib64/libcudnn* |
(9)把以下内容添加到~/.bashrc
export CUDA_HOME=/usr/local/cuda
(10)使环境变量立即生效
(11)安装Anaconda
先从Anaconda官网下载最新版本,然后,在文件所在目录运行如下命令。
Anaconda的详细安装可参考TensorFlow CPU版本的说明。
(12)使环境变量立即生效
(13)创建 conda 环境为安装tensorflow
# press y a few times
(14)激活环境
(15)安装tensorflow -GPU
(16)验证安装是否成功
hello = tf.constant('Hello, TensorFlow!')
sess = tf.Session()
print(sess.run(hello))
6.3远程访问Jupyter Notebook
(1)生成配置文件
(2)生成当前用户登录jupyter密码
打开ipython, 创建一个密文密码
In [2]: passwd()
Enter password:
Verify password:
(3)修改配置文件
进行如下修改:
c.NotebookApp.password = u'sha:ce...刚才复制的那个密文'
c.NotebookApp.open_browser = False # 禁止自动打开浏览器
c.NotebookApp.port =8888 #这是缺省端口,也可指定其它端口
(4)启动jupyter notebook
nohup jupyter notebook >/dev/null 2>&1 &
然在浏览器上,输入IP:port,即可看到如下类似界面。

然后,我们就可以在浏览器进行开发调试Python或Tensorflow程序了。
6.4比较CPU与GPU 性能
(1)设备设为GPU
|
1 2 3 4 5 6 7 8 9 10 11 12 13 14 15 16 17 18 19 20 21 22 23 |
import sys import numpy as np import tensorflow as tf from datetime import datetime device_name="/gpu:0" shape=(int(10000),int(10000)) with tf.device(device_name): #形状为shap,元素服从minval和maxval之间的均匀分布 random_matrix = tf.random_uniform(shape=shape, minval=0, maxval=1) dot_operation = tf.matmul(random_matrix, tf.transpose(random_matrix)) sum_operation = tf.reduce_sum(dot_operation) startTime = datetime.now() with tf.Session(config=tf.ConfigProto(log_device_placement=True)) as session: result = session.run(sum_operation) print(result) print("\n" * 2) print("Shape:", shape, "Device:", device_name) print("Time taken:", datetime.now() - startTime) |
2.50004e+11
Shape: (10000, 10000) Device: /gpu:0
Time taken: 0:00:02.605461
(2)把设备改为CPU
把设备改为cpu,运行以上代码,其结果如下:
2.50199e+11
Shape: (10000, 10000) Device: /cpu:0
Time taken: 0:00:07.232871
这个实例运算较简单,但即使简单,GPU也是CPU的近3倍。GPU还是非常不错的。
6.5单GPU与多GPU 性能比较
这里比较使用一个GPU与使用多个(如两个)GPU的性能比较。
|
1 2 3 4 5 6 7 8 9 10 11 12 13 14 15 16 17 18 19 20 21 22 23 24 25 26 27 28 29 30 31 32 33 34 35 36 37 38 39 40 41 42 43 44 45 46 47 48 49 50 51 52 53 54 55 56 57 58 59 60 61 62 63 64 65 66 67 68 69 70 71 72 73 74 75 76 77 78 79 80 81 82 83 84 |
''' This tutorial requires your machine to have 2 GPUs "/cpu:0": The CPU of your machine. "/gpu:0": The first GPU of your machine "/gpu:1": The second GPU of your machine ''' import numpy as np import tensorflow as tf import datetime # Processing Units logs log_device_placement = True # Num of multiplications to perform n = 10 ''' Example: compute A^n + B^n on 2 GPUs Results on 8 cores with 2 GTX-980: * Single GPU computation time: 0:00:11.277449 * Multi GPU computation time: 0:00:07.131701 ''' # Create random large matrix A = np.random.rand(10000, 10000).astype('float32') B = np.random.rand(10000, 10000).astype('float32') # Create a graph to store results c1 = [] c2 = [] def matpow(M, n): if n < 1: #Abstract cases where n < 1 return M else: return tf.matmul(M, matpow(M, n-1)) ''' Single GPU computing ''' with tf.device('/gpu:0'): a = tf.placeholder(tf.float32, [10000, 10000]) b = tf.placeholder(tf.float32, [10000, 10000]) # Compute A^n and B^n and store results in c1 c1.append(matpow(a, n)) c1.append(matpow(b, n)) with tf.device('/cpu:0'): sum = tf.add_n(c1) #Addition of all elements in c1, i.e. A^n + B^n t1_1 = datetime.datetime.now() with tf.Session(config=tf.ConfigProto(log_device_placement=log_device_placement)) as sess: # Run the op. sess.run(sum, {a:A, b:B}) t2_1 = datetime.datetime.now() ''' Multi GPU computing ''' # GPU:0 computes A^n with tf.device('/gpu:0'): # Compute A^n and store result in c2 a = tf.placeholder(tf.float32, [10000, 10000]) c2.append(matpow(a, n)) # GPU:1 computes B^n with tf.device('/gpu:1'): # Compute B^n and store result in c2 b = tf.placeholder(tf.float32, [10000, 10000]) c2.append(matpow(b, n)) with tf.device('/cpu:0'): sum = tf.add_n(c2) #Addition of all elements in c2, i.e. A^n + B^n t1_2 = datetime.datetime.now() with tf.Session(config=tf.ConfigProto(log_device_placement=log_device_placement)) as sess: # Run the op. sess.run(sum, {a:A, b:B}) t2_2 = datetime.datetime.now() print("Single GPU computation time: " + str(t2_1-t1_1)) print("Multi GPU computation time: " + str(t2_2-t1_2)) |
运行结果:
Single GPU computation time: 0:00:23.821055
Multi GPU computation time: 0:00:12.078067
Pingback引用通告: Python与人工智能 – 飞谷云人工智能