第18章 CNN实例--人脸识别
广义的人脸识别实际包括构建人脸识别系统的一系列相关技术,包括人脸图像采集、人脸定位或检测、人脸识别预处理、身份确认以及身份查找等;而狭义的人脸识别特指通过人脸进行身份确认或者身份查找的技术或系统。 人脸识别是一项热门的计算机技术研究领域,它属于生物特征识别技术,是对生物体(一般特指人)本身的生物特征来区分生物体个体。本章主要内容如下:
1)先获取自己的头像,可以通过手机、电脑等拍摄;
2)下载别人的头像,具体网址详见下节;
3)利用dlib、opencv对人脸进行检测;
4)根据检测后的图片,利用卷积神经网络训练模型;
5)把新头像用模型进行识别,看模型是否能认出是你。
18.1 人脸识别简介
广义的人脸识别实际包括构建人脸识别系统的一系列相关技术,包括人脸图像采集、人脸定位、人脸识别预处理、身份确认以及身份查找等;而狭义的人脸识别特指通过人脸进行身份确认或者身份查找的技术或系统。
人脸识别是一项热门的计算机技术研究领域,它属于生物特征识别技术,是对生物体(一般特指人)本身的生物特征来区分生物体个体。生物特征识别技术所研究的生物特征包括脸、指纹、手掌纹、虹膜、视网膜、声音(语音)、体形、个人习惯(例如敲击键盘的力度和频率、签字)等,相应的识别技术就有人脸识别、指纹识别、掌纹识别、虹膜识别、视网膜识别、语音识别(用语音识别可以进行身份识别,也可以进行语音内容的识别,只有前者属于生物特征识别技术)、体形识别、键盘敲击识别、签字识别等。
人脸识别的优势在于其自然性和不被被测个体察觉的特点,容易被大家接受。
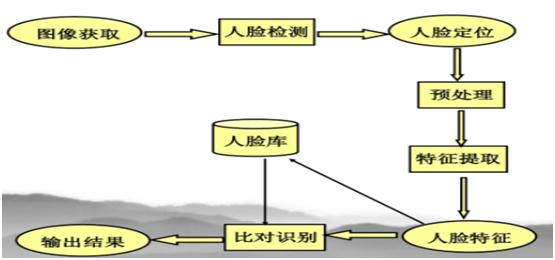
人脸识别的一般处理流程,如下图:
其中:
1)图像获取:可以通过摄像镜把人脸图像采集下来头或图片上传等方式
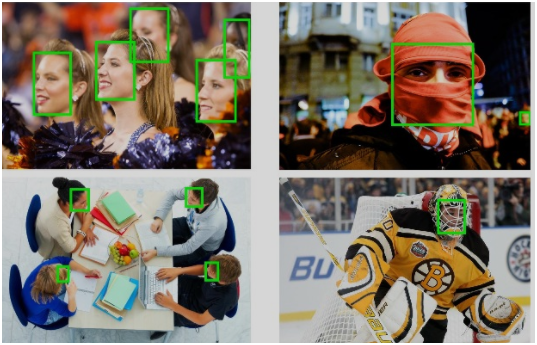
2)人脸检测:就是给定任意一张图片,找到其中是否存在一个或多个人脸,并返回图片中 每个人脸的位置、范围及特征等。如下图:
3)人脸定位:通过人脸来确定位置信息。
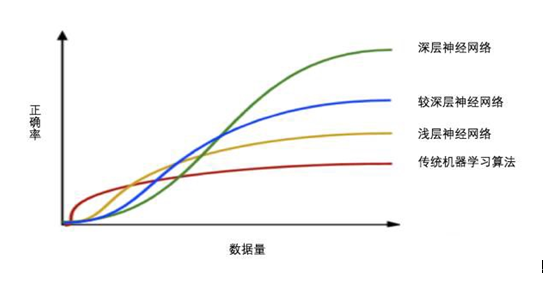
4)预处理:基于人脸检测结果,对图像进行处理,为后续的特征提取服务。系统获取到的人脸图像可能受到各种条件的限制或影响,需要对进行大小缩放、旋转、拉伸、灰度变换规范化及过滤等图像预处理。由于图像中存在很多干扰因素,如外部因素:清晰度、天气、角度、距离等;目标本身因素:胖瘦,假发、围巾、银镜、表情等。所以神经网络一般需要比较多的训练数据,才能从原始的特征中提炼出有意义的特征。如下图所示,如果数据少了,神经网络性能可能还不及传统机器学习。
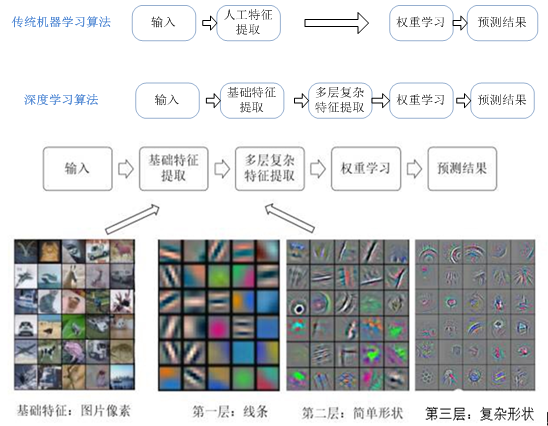
5)特征提取:就是将人脸图像信息数字化,把人脸图像转换为一串数字。特征提取是一项重要内容,传统机器学习这部分往往要占据大部分时间和精力,有时虽然花去了时间,效果却不一定理想,好在深度学习很多都是自动获取特征,下图为传统机器学习与深度学习的一些异同,尤其是在提取特征方面。
6)人脸特征:找到人脸的一些关键特征或位置,如眼镜、嘴唇、鼻子、下巴等的位置,利用特征点间的欧氏距离、曲率和角度等提取特征分量,最终把相关的特征连接成一个长的特征向量。如下图显示人脸的一些特征点。
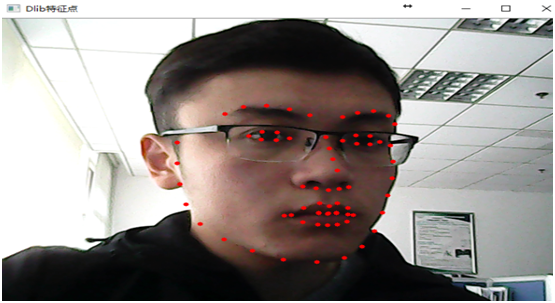
7)比对识别:通过模型回答两张人脸属于相同的人或指出一张新脸是人脸库中的谁的脸。
8)输出结果:对人脸库中的新图像进行身份认证,并给出是或否的结果。
人脸识别的应用非常广泛,主要有:
1)门禁系统:受安全保护的地区可以通过人脸识别辨识试图进入者的身份,比如监狱、看守所、小区、学校等。
2)摄像监视系统:在例如银行、机场、体育场、商场、超级市场等公共场所对人群进行监视,以达到身份识别的目的。例如在机场安装监视系统以防止恐怖分子登机。
3)网络应用:利用人脸识别辅助信用卡网络支付,以防止非信用卡的拥有者使用信用卡,社保支付防止冒领等。
4)学生考勤系统:香港及澳门的中、小学已开始将智能卡配合人脸识别来为学生进行每天的出席点名记录。
5)相机:新型的数码相机已内建人脸识别功能以辅助拍摄人物时对焦。
6)智能手机:解锁手机、识别使用者等。
18.2 导入数据
获取其他人脸图片集
需要收集一个其他人脸的图片集,只要不是自己的人脸都可以,可以在网上找到,这里我给出一个我用到的图片集:
网站地址:http://vis-www.cs.umass.edu/lfw/
图片集下载:http://vis-www.cs.umass.edu/lfw/lfw.tgz
先将下载的图片集,解压到项目目录下的lfw目录下,也可以自己指定目录(修改代码中的input_dir变量)
程序中使用的是dlib来识别人脸部分,也可以使用opencv来识别人脸,在实际使用过程中,dlib的识别效果比opencv的好,但opencv识别的速度会快很多,获取10000张人脸照片的情况下,dlib大约花费了1小时,而opencv的花费时间大概只有20分钟。opencv可能会识别一些奇怪的部分,所以综合考虑之后我使用了dlib来识别人脸。
1)导入需要的包,这里使用dlib库进行人脸识别。
import os
import cv2
import dlib
2)定义输入、输出目录,文件解压到当前目录./data/my_faces目录下。
#我的头像(可以用手机或电脑等拍摄,尽量清晰、尽量多,越多越好)上传到以下input_dir目录下,output_dir为检测以后的头像
output_dir = './data/my_faces'
size = 64
3)判断输出目录是否存在,不存在,则创建。
os.makedirs(output_dir)
18.3 预处理数据
接下来使用dlib来批量识别图片中的人脸部分,并对原图像进行预处理,并保存到指定目录下。
1)预处理我的头像
index = 1
for (path, dirnames, filenames) in os.walk(input_dir):
for filename in filenames:
if filename.endswith('.jpg'):
print('Being processed picture %s' % index)
img_path = path+'/'+filename
# 从文件读取图片
img = cv2.imread(img_path)
# 转为灰度图片
gray_img = cv2.cvtColor(img, cv2.COLOR_BGR2GRAY)
# 使用detector进行人脸检测 dets为返回的结果
dets = detector(gray_img, 1)
#使用enumerate 函数遍历序列中的元素以及它们的下标
#下标i即为人脸序号
#left:人脸左边距离图片左边界的距离 ;right:人脸右边距离图片左边界的距离
#top:人脸上边距离图片上边界的距离 ;bottom:人脸下边距离图片上边界的距离
for i, d in enumerate(dets):
x1 = d.top() if d.top() > 0 else 0
y1 = d.bottom() if d.bottom() > 0 else 0
x2 = d.left() if d.left() > 0 else 0
y2 = d.right() if d.right() > 0 else 0
# img[y:y+h,x:x+w]
face = img[x1:y1,x2:y2]
# 调整图片的尺寸
face = cv2.resize(face, (size,size))
cv2.imshow('image',face)
# 保存图片
cv2.imwrite(output_dir+'/'+str(index)+'.jpg', face)
index += 1
key = cv2.waitKey(30) & 0xff
if key == 27:
sys.exit(0)
Being processed picture 109
Being processed picture 110
Being processed picture 111
Being processed picture 112
Being processed picture 113
Being processed picture 114
Being processed picture 115
这是处理后我的一张头像

2)用同样方法预处理别人的头像(我只选用别人部分头像)
#别人图片输入输出目录
output_dir = './data/other_faces'
size = 64
3)判断输出目录是否存在,不存在,则创建。
os.makedirs(output_dir)
4)预处理别人头像,同样调用本节的1)程序。
运行结果如下:
Being processed picture 264
Being processed picture 265
Being processed picture 266
Being processed picture 267
Being processed picture 268
Being processed picture 269
这是处理后别人的一张头像

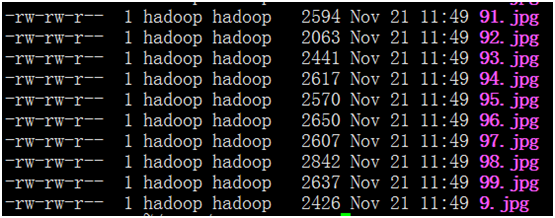
以下是经预处理后的文件格式,各文件已标上序列号。
18.4 训练模型
有了训练数据之后,通过cnn来训练数据,就可以让她记住我的人脸特征,学习怎么认识我了。
1)导入需要的库
import cv2
import numpy as np
import os
import random
import sys
from sklearn.model_selection import train_test_split
2)定义预处理后图片(我的和别人的)所在目录
other_faces_path = './data/other_faces'
size = 64
3) 利用卷积循环网络开始训练,标注时我的表为[0,1],别人的标注为[1,0]
labs = []
#重新创建图形变量
tf.reset_default_graph()
def getPaddingSize(img):
h, w, _ = img.shape
top, bottom, left, right = (0,0,0,0)
longest = max(h, w)
if w < longest:
tmp = longest - w
# //表示整除符号
left = tmp // 2
right = tmp - left
elif h < longest: tmp = longest - h top = tmp // 2 bottom = tmp - top else: pass return top, bottom, left, right def readData(path , h=size, w=size): for filename in os.listdir(path): if filename.endswith('.jpg'): filename = path + '/' + filename img = cv2.imread(filename) top,bottom,left,right = getPaddingSize(img) # 将图片放大, 扩充图片边缘部分 img = cv2.copyMakeBorder(img, top, bottom, left, right, cv2.BORDER_CONSTANT, value=[0,0,0]) img = cv2.resize(img, (h, w)) imgs.append(img) labs.append(path) readData(my_faces_path) readData(other_faces_path) # 将图片数据与标签转换成数组 imgs = np.array(imgs) labs = np.array([[0,1] if lab == my_faces_path else [1,0] for lab in labs]) # 随机划分测试集与训练集 train_x,test_x,train_y,test_y = train_test_split(imgs, labs, test_size=0.05, random_state=random.randint(0,100)) # 参数:图片数据的总数,图片的高、宽、通道 train_x = train_x.reshape(train_x.shape[0], size, size, 3) test_x = test_x.reshape(test_x.shape[0], size, size, 3) # 将数据转换成小于1的数 train_x = train_x.astype('float32')/255.0 test_x = test_x.astype('float32')/255.0 print('train size:%s, test size:%s' % (len(train_x), len(test_x))) # 图片块,每次取100张图片 batch_size = 20 num_batch = len(train_x) // batch_size x = tf.placeholder(tf.float32, [None, size, size, 3]) y_ = tf.placeholder(tf.float32, [None, 2]) keep_prob_5 = tf.placeholder(tf.float32) keep_prob_75 = tf.placeholder(tf.float32) def weightVariable(shape): init = tf.random_normal(shape, stddev=0.01) return tf.Variable(init) def biasVariable(shape): init = tf.random_normal(shape) return tf.Variable(init) def conv2d(x, W): return tf.nn.conv2d(x, W, strides=[1,1,1,1], padding='SAME') def maxPool(x): return tf.nn.max_pool(x, ksize=[1,2,2,1], strides=[1,2,2,1], padding='SAME') def dropout(x, keep): return tf.nn.dropout(x, keep) def cnnLayer(): # 第一层 W1 = weightVariable([3,3,3,32]) # 卷积核大小(3,3), 输入通道(3), 输出通道(32) b1 = biasVariable([32]) # 卷积 conv1 = tf.nn.relu(conv2d(x, W1) + b1) # 池化 pool1 = maxPool(conv1) # 减少过拟合,随机让某些权重不更新 drop1 = dropout(pool1, keep_prob_5) # 第二层 W2 = weightVariable([3,3,32,64]) b2 = biasVariable([64]) conv2 = tf.nn.relu(conv2d(drop1, W2) + b2) pool2 = maxPool(conv2) drop2 = dropout(pool2, keep_prob_5) # 第三层 W3 = weightVariable([3,3,64,64]) b3 = biasVariable([64]) conv3 = tf.nn.relu(conv2d(drop2, W3) + b3) pool3 = maxPool(conv3) drop3 = dropout(pool3, keep_prob_5) # 全连接层 Wf = weightVariable([8*16*32, 512]) bf = biasVariable([512]) drop3_flat = tf.reshape(drop3, [-1, 8*16*32]) dense = tf.nn.relu(tf.matmul(drop3_flat, Wf) + bf) dropf = dropout(dense, keep_prob_75) # 输出层 Wout = weightVariable([512,2]) bout = weightVariable([2]) #out = tf.matmul(dropf, Wout) + bout out = tf.add(tf.matmul(dropf, Wout), bout) return out def cnnTrain(): out = cnnLayer() cross_entropy = tf.reduce_mean(tf.nn.softmax_cross_entropy_with_logits(logits=out, labels=y_)) train_step = tf.train.AdamOptimizer(0.01).minimize(cross_entropy) # 比较标签是否相等,再求的所有数的平均值,tf.cast(强制转换类型) accuracy = tf.reduce_mean(tf.cast(tf.equal(tf.argmax(out, 1), tf.argmax(y_, 1)), tf.float32)) # 将loss与accuracy保存以供tensorboard使用 tf.summary.scalar('loss', cross_entropy) tf.summary.scalar('accuracy', accuracy) merged_summary_op = tf.summary.merge_all() # 数据保存器的初始化 saver = tf.train.Saver() with tf.Session() as sess: sess.run(tf.global_variables_initializer()) summary_writer = tf.summary.FileWriter('./tmp', graph=tf.get_default_graph()) for n in range(10): # 每次取128(batch_size)张图片 for i in range(num_batch): batch_x = train_x[i*batch_size : (i+1)*batch_size] batch_y = train_y[i*batch_size : (i+1)*batch_size] # 开始训练数据,同时训练三个变量,返回三个数据 _,loss,summary = sess.run([train_step, cross_entropy, merged_summary_op], feed_dict={x:batch_x,y_:batch_y, keep_prob_5:0.5,keep_prob_75:0.75}) summary_writer.add_summary(summary, n*num_batch+i) # 打印损失 print(n*num_batch+i, loss) if (n*num_batch+i) % 40 == 0: # 获取测试数据的准确率 acc = accuracy.eval({x:test_x, y_:test_y, keep_prob_5:1.0, keep_prob_75:1.0}) print(n*num_batch+i, acc) # 由于数据不多,这里设为准确率大于0.80时保存并退出 if acc > 0.8 and n > 2:
#saver.save(sess, './train_face_model/train_faces.model',global_step=n*num_batch+i)
saver.save(sess, './train_face_model/train_faces.model')
#sys.exit(0)
#print('accuracy less 0.80, exited!')
cnnTrain()
运行结果:
278 0.69154
279 0.068455
280 0.092965
280 1.0
281 0.189453
282 0.0440276
283 0.078829
284 0.32079
285 0.476557
286 0.193189
287 0.147238
288 0.2862
289 0.514215
290 0.0191329
291 0.0881194
292 0.337078
293 0.191775
294 0.054846
295 0.268961
296 0.1875
297 0.11575
298 0.175487
299 0.168204
18.5 测试模型
用训练得到的模型,测试我新拍摄的头像,看她是否认识我。
首先,把我的4张测试照片放在./data/face_recog/test_faces目录,然后,让模型来识别这些照片是否是我。
input_dir='./data/face_recog/test_faces'
index=1
output = cnnLayer()
predict = tf.argmax(output, 1)
#先加载 meta graph并恢复权重变量
saver = tf.train.import_meta_graph('./train_face_model/train_faces.model.meta')
sess = tf.Session()
saver.restore(sess, tf.train.latest_checkpoint('./train_face_model/'))
#saver.restore(sess,tf.train.latest_checkpoint('./my_test_model/'))
def is_my_face(image):
sess.run(tf.global_variables_initializer())
res = sess.run(predict, feed_dict={x: [image/255.0], keep_prob_5:1.0, keep_prob_75: 1.0})
if res[0] == 1:
return True
else:
return False
#使用dlib自带的frontal_face_detector作为我们的特征提取器
detector = dlib.get_frontal_face_detector()
#cam = cv2.VideoCapture(0)
#while True:
#_, img = cam.read()
for (path, dirnames, filenames) in os.walk(input_dir):
for filename in filenames:
if filename.endswith('.jpg'):
print('Being processed picture %s' % index)
index+=1
img_path = path+'/'+filename
# 从文件读取图片
img = cv2.imread(img_path)
gray_image = cv2.cvtColor(img, cv2.COLOR_BGR2GRAY)
dets = detector(gray_image, 1)
if not len(dets):
print('Can`t get face.')
cv2.imshow('img', img)
key = cv2.waitKey(30) & 0xff
if key == 27:
sys.exit(0)
for i, d in enumerate(dets):
x1 = d.top() if d.top() > 0 else 0
y1 = d.bottom() if d.bottom() > 0 else 0
x2 = d.left() if d.left() > 0 else 0
y2 = d.right() if d.right() > 0 else 0
face = img[x1:y1,x2:y2]
# 调整图片的尺寸
face = cv2.resize(face, (size,size))
print('Is this my face? %s' % is_my_face(face))
cv2.rectangle(img, (x2,x1),(y2,y1), (255,0,0),3)
cv2.imshow('image',img)
key = cv2.waitKey(30) & 0xff
if key == 27:
sys.exit(0)
sess.close()
测试结果:
INFO:tensorflow:Restoring parameters from ./train_face_model/train_faces.model
Being processed picture 1
Is this my face? False
Being processed picture 2
Is this my face? True
Being processed picture 3
Is this my face? True
Being processed picture 4
Is this my face? True
通过识别我的脸来判断是否是我:
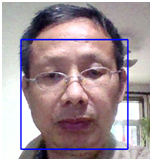
结果不错,4张照片,认出了3张。
因这次拍摄照片不多(不到200张),清晰度也不很好,有这个结果,感觉还不错,如果要想达到98%以上的精度,拍摄多一点照片是有效方法。
此外,本身算法还有很多优化空间。
一天不来访,浑身上下痒!
谢谢,支持
Pingback引用通告: Python与人工智能 – 飞谷云人工智能